
Are you struggling to capture the magic of your lighted Christmas decorations with your Coolpix B500? You’re not alone.
Taking great photos of glowing lights can be tricky, but with a few simple tips, you can make your holiday shots shine like never before. Imagine your festive decorations popping with vibrant colors and crisp details every time you snap a picture.
Keep reading, and you’ll discover easy steps to transform your Christmas photos from dull to dazzling using your Coolpix B500. Your holiday memories deserve to look amazing—let’s make that happen!
Choosing The Right Settings
Choosing the right settings on your Coolpix B500 is key to capturing beautiful lighted Christmas decorations. These settings control how much light reaches the camera sensor. Adjusting them helps you avoid dark or blurry photos. You can highlight the glowing lights and keep the colors vivid. Small changes make a big difference in your pictures.
Adjusting Iso For Low Light
ISO controls the camera’s sensitivity to light. A higher ISO brightens your photo but adds grainy noise. Use a low ISO like 100 or 200 for clear images. Raise it to 400 or 800 if the scene is very dark. Avoid going too high to keep your photo sharp and clean.
Selecting The Best Aperture
Aperture affects the depth of field and light entry. Use a wider aperture (low f-number) to let in more light. This creates a nice blurry background that makes decorations stand out. An aperture around f/3.5 to f/5.6 works well for most shots. Smaller apertures keep more of the scene in focus but need more light.
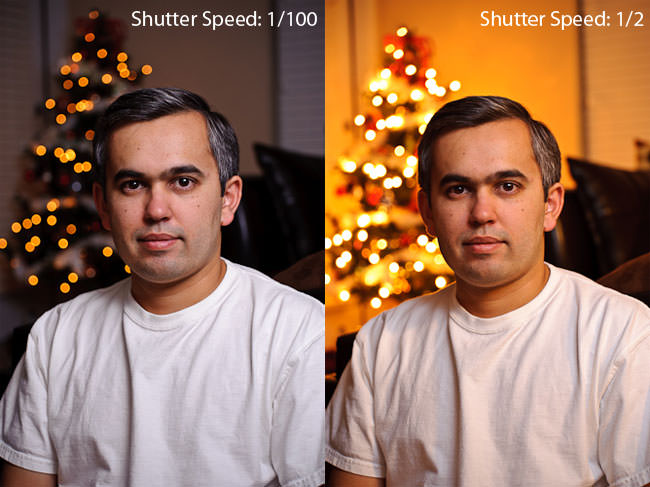
Shutter Speed Tips
Shutter speed controls how long the camera sensor is exposed to light. Slow shutter speed captures more light but can cause blur from camera shake. Use a tripod or steady surface for slow speeds below 1/30 second. Faster shutter speeds freeze motion but need more light. Adjust shutter speed to balance brightness and sharpness.
Credit: photographylife.com
Using Manual Mode Effectively
Taking lighted Christmas decorations on your Coolpix B500 can be a delightful experience when using manual mode effectively. This camera, with its versatile features, allows you to capture the magical ambiance of twinkling lights beautifully. By mastering manual mode, you can control settings to ensure your photos do justice to the holiday spirit.
Setting Exposure Compensation
Exposure compensation is a key tool in manual mode that helps you balance the brightness of your photo. When shooting Christmas lights, adjusting the exposure can prevent the lights from appearing too bright or too dim. Experiment with the exposure compensation dial to find the right balance. If the lights are overpowering the scene, try reducing the exposure slightly to reveal more detail in surrounding elements.
On a snowy night, you might notice the light reflecting off the snow, causing overexposure. In such cases, setting the exposure compensation to a negative value can help. Have you ever tried capturing decorations after dusk? A positive exposure compensation can enhance the glow of the lights against a dark background.
Focusing In The Dark
Focusing in low light can be challenging, but the Coolpix B500 makes it manageable. Use manual focus to avoid the camera hunting for focus in the dark. Adjust the focus ring until the lights are sharp and clear. Sometimes, autofocus struggles with tiny light sources, and manual focus provides better control.
Consider using a flashlight to illuminate the subject briefly for initial focusing. This technique can save you time and frustration. Have you found yourself missing the perfect shot because of blurry images? Manual focusing helps you avoid this by giving you direct control over clarity.
Stabilizing Your Camera
Stabilizing your camera is essential when photographing lighted Christmas decorations with your Coolpix B500. Without a steady base, even the slightest shake can blur your photos, especially in low light. Keeping your camera stable allows you to capture crisp, vivid images that truly reflect the festive glow.
Using A Tripod Or Stable Surface
A tripod is the best tool to keep your camera perfectly still. It holds your Coolpix B500 steady, letting you use slower shutter speeds without worrying about blur.
If you don’t have a tripod, look for a stable surface like a table, wall, or ledge. Rest your camera on it to reduce movement. Even leaning against a solid object can help steady your shot.
- Make sure your tripod or surface is firm and won’t wobble.
- Use your camera’s timer to avoid shake when pressing the shutter button.
- Position your camera at the right angle before locking it in place.
Have you noticed how much sharper your photos are when the camera doesn’t move? This small adjustment can make a huge difference in capturing the magic of Christmas lights.
Remote Shutter Release Options
Pressing the shutter button can cause a tiny shake that blurs your photo. Remote shutter releases let you snap pictures without touching your camera.
You can use a wireless remote or connect your Coolpix B500 to your smartphone via Nikon’s app. Both options give you control from a distance, so your camera stays rock solid.
- Wireless remotes often work up to several meters away—great for creative angles.
- Smartphone apps let you preview and control settings remotely.
- Using a remote is especially helpful for long exposures during night shots.
Have you ever tried taking a photo and noticed the slightest blur? Using a remote shutter can eliminate that completely, making your Christmas light photos impressively sharp and clear.
Optimizing White Balance
Optimizing the white balance on your Coolpix B500 is key to capturing the true colors of lighted Christmas decorations. The right white balance setting prevents your photos from looking too blue, yellow, or unnatural. Adjusting it correctly ensures that the warm glow of your lights shines just as you see it with your eyes.
Choosing The Correct Preset
Your Coolpix B500 offers several white balance presets designed for different lighting conditions. For Christmas lights, try the “Incandescent” or “Tungsten” preset. These settings reduce the orange or yellow cast that indoor bulbs often create.
Test each preset by taking a quick shot and reviewing it on your camera screen. Does the color of your lights look as vibrant as in real life? If not, switch to another preset until you find the one that matches best.
Custom White Balance Settings
When presets don’t quite capture the mood you want, setting a custom white balance can make all the difference. You can use a plain white paper or a neutral gray card placed near your decorations as a reference.
Point your camera at the paper or card and follow your Coolpix B500’s instructions to set the custom white balance. This step tells your camera exactly what “white” should look like, making all other colors appear more natural.
Have you ever noticed how some Christmas light photos look too cool or too warm? Custom white balance lets you take full control and create images that feel cozy and festive—just like the scene in front of you.
Composition Tips For Lighted Decorations
Capturing lighted Christmas decorations with your Coolpix B500 is more than just pointing and shooting. Thoughtful composition can transform ordinary shots into stunning holiday memories. Let’s look at how you can arrange your frame and use surroundings to make those lights truly pop.
Framing For Impact
Think about how you want your viewer’s eyes to move across the photo. Use the rule of thirds by placing key lights or ornaments off-center to create a natural flow. Zoom in to highlight details like sparkling bulbs or glowing garlands, but don’t lose the context of the scene.
Try different angles—shoot from low to give the tree a towering effect or from the side to capture depth. Your Coolpix B500’s zoom can help isolate clusters of lights that tell a story on their own. Ask yourself: which part of the decoration draws you in first?
Incorporating Background Elements
Backgrounds can either enhance or distract from your lighted decorations. Look for simple, dark areas that make the lights stand out like stars against the night sky. Avoid clutter that competes with your main subject.
Sometimes, adding a subtle background element like a softly lit window or a hint of holiday wreath can add warmth and context. Use your camera’s aperture settings to blur the background and keep the focus sharp on your lights. What background details could add meaning to your shot without stealing the spotlight?

Credit: www.sandracoaneducation.com
Post-processing Ideas
After capturing your lighted Christmas decorations with the Coolpix B500, the magic doesn’t stop there. Post-processing can dramatically improve your photos, making those twinkling lights pop and the festive colors shine brighter. These ideas focus on simple adjustments you can make to elevate your holiday shots without needing advanced editing skills.
Enhancing Colors And Contrast
Boosting colors and contrast can transform a flat photo into something vibrant and eye-catching. Try increasing the saturation slightly to make reds and greens more vivid, but avoid overdoing it to keep the scene natural. Adjusting contrast helps add depth, making the lights stand out against darker backgrounds.
Have you noticed how some holiday photos feel dull? A quick tweak in the contrast slider often brings back the sparkle, literally. Use photo editing apps like Lightroom or even free tools like Snapseed to experiment with these settings.
Reducing Noise In Images
Low light conditions, like those when photographing Christmas lights, often cause grainy or noisy images. Noise reduction tools can smooth out those unwanted speckles without sacrificing too much detail. This makes your photo look cleaner and more professional.
If your Coolpix B500 photos look noisy, especially when shot at higher ISO, try applying noise reduction during editing. Just be cautious—too much noise reduction can blur fine details, so find the right balance by zooming in to check the results.

Credit: www.facebook.com
Frequently Asked Questions
How To Set The Right Iso For Christmas Lights On Coolpix B500?
Set your Coolpix B500 ISO between 400 and 800 for clear lighted decorations. Higher ISO increases brightness but may add noise. Adjust based on ambient light and test shots to find the best balance.
What Camera Mode Is Best For Lighted Christmas Decorations?
Use the “Night Scene” or “Scene” mode on Coolpix B500 for lighted decorations. These modes optimize exposure settings automatically for low-light conditions, capturing colorful lights sharply without much manual adjustment.
How To Avoid Blurry Christmas Light Photos On Coolpix B500?
Use a tripod or stable surface to prevent camera shake. Set a slower shutter speed and enable the camera’s timer to minimize movement. This ensures sharp, clear photos of glowing Christmas decorations.
Can I Use Manual Focus For Christmas Lights On Coolpix B500?
Yes, manual focus helps capture crisp Christmas lights on Coolpix B500. Switch to manual focus and adjust until lights appear sharp. This avoids autofocus hunting in low light and improves photo clarity.
Conclusion
Capturing lighted Christmas decorations with your Coolpix B500 can be simple. Use the right settings and steady hands to get clear shots. Experiment with angles to show the lights’ beauty. Don’t rush; take your time to find the best view.
Practice helps improve your photos every time. Enjoy the process and share your festive pictures with friends. This way, your holiday memories will shine bright in every frame.