Imagine turning simple glass blocks into stunning lighted decorations that brighten up any room or event. You don’t need fancy tools or skills to create these eye-catching pieces.
With just a few easy steps, you can make your own glowing glass block decorations that add warmth and charm to your space. Ready to learn how? Keep reading, and you’ll discover how simple it is to craft these beautiful lights yourself.
Your home—and your guests—will thank you.

Credit: www.tiktok.com
Choosing The Right Glass Blocks
Choosing the right glass blocks sets the foundation for your lighted glass block decorations. The type, size, and source of your blocks affect both the look and functionality of your project. Picking blocks that fit your vision and space will make your decoration truly stand out.
Types Of Glass Blocks
Glass blocks come in various textures and styles. Clear blocks provide a classic look and allow light to shine through brightly. Frosted or patterned blocks diffuse light softly, creating a cozy ambiance.
Some blocks feature built-in designs, like bubbles or waves, adding visual interest. Consider the lighting effect you want before choosing the type. Have you thought about how different textures might change the mood in your room?
Sizing And Shapes
Standard glass blocks usually measure 8×8 inches, but smaller or larger sizes are available. Square blocks are common, but rectangular and even curved shapes exist for unique designs. The size you choose impacts how many lights fit inside and the overall scale of your decoration.
Measure the space where you plan to place your decoration carefully. Would a large block make a bold statement, or would smaller blocks arranged together create a better effect? Think about how size and shape work with your lighting setup.
Where To Buy
Glass blocks are available at most home improvement stores and specialty glass suppliers. Online retailers offer a wide selection, sometimes including rare shapes or custom sizes. Prices can vary greatly, so compare options before buying.
Look for suppliers with good return policies in case a block arrives damaged. Local stores let you see and feel the blocks before purchase, which can be helpful. Have you checked reviews or asked for recommendations to find reliable sellers?
Selecting Lighting Options
When crafting your own lighted glass block decorations, selecting the right lighting options is crucial to achieving the desired ambiance. The type of lights you choose can transform your decorations from ordinary to extraordinary. With various lighting options available, it’s essential to weigh the pros and cons to make the best decision for your project. Let’s delve into some popular lighting choices.
Led Strips Vs. Fairy Lights
LED strips and fairy lights are two popular options for illuminating glass blocks. LED strips are known for their bright and uniform glow, making them ideal for creating striking visual effects. They can be easily cut to fit the size of your glass block, providing flexibility in design.
On the other hand, fairy lights offer a softer, twinkling effect that adds a touch of whimsy and charm. Their delicate appearance makes them perfect for creating a cozy atmosphere. Consider the mood you want to evoke with your decorations before choosing between these two options.
Battery Powered Vs. Plug-in
Another consideration is whether to use battery-powered or plug-in lights. Battery-powered lights offer convenience and portability, allowing you to place your glass blocks anywhere without worrying about proximity to an outlet. They are excellent for temporary displays or outdoor settings.
In contrast, plug-in lights provide a steady power source, making them ideal for permanent installations. They ensure your decorations remain lit without the hassle of replacing batteries. Think about where you plan to display your glass blocks to determine which power source suits your needs.
Color And Brightness Choices
The color and brightness of your lights can dramatically influence the look of your glass block decorations. White lights are classic and versatile, but colored lights can add a festive or thematic flair. Consider using multi-color LED strips for a dynamic effect that can be adjusted according to the occasion.
Brightness levels are equally important. Bright lights can create a bold statement, while dimmer options provide subtle illumination. Imagine the atmosphere you wish to create—do you want your glass blocks to be a focal point or a gentle background glow? Your choice will impact the overall aesthetic of your decorations.
Choosing the right lighting for your glass block decorations is a personal decision that can reflect your style and creativity. As you weigh your options, think about the mood you want to set and how each choice will enhance your designs. What lighting option will make your glass block decorations shine the brightest?
Tools And Materials Needed
Creating lighted glass block decorations requires specific tools and materials. Gathering the right items ensures your project goes smoothly. It helps to prepare everything before starting to avoid interruptions.
Each material and tool plays a key role in building a beautiful lighted glass block. Safety and creativity both matter in this craft. Below are the main categories to focus on.
Adhesives And Sealants
- Clear silicone sealant for strong, invisible bonds
- Epoxy glue for durable connections between glass and lights
- Caulk gun to apply sealant neatly
- Double-sided tape for temporary holds
Decorative Elements
- Glass blocks, clean and free of cracks
- LED string lights or fairy lights for illumination
- Colored glass beads or gems for sparkle
- Frosted glass spray paint for a soft glow effect
- Ribbon or decorative wire for extra design
Safety Gear
- Protective gloves to avoid cuts from glass edges
- Safety glasses to protect eyes from shards or dust
- Dust mask if sanding or spraying paint
- Work apron to keep clothes clean
Preparing Glass Blocks For Decoration
Getting your glass blocks ready for decoration is an essential step that sets the foundation for a stunning lighted display. Proper preparation ensures your decorations stick well and look flawless. Taking the time to clean, remove residues, and prepare the surface will save you frustration and improve the final outcome.
Cleaning And Drying
Start by washing the glass blocks thoroughly with warm, soapy water. Use a soft sponge to avoid scratching the surface. This removes dust, dirt, and oils that could prevent adhesives or paint from sticking.
After washing, rinse with clean water and dry the blocks completely using a lint-free cloth. Leaving moisture behind can cause bubbles or peeling later on. A dry surface is key for long-lasting decoration.
Removing Labels And Residue
Many glass blocks come with stubborn labels or stickers. Peel off as much as you can by hand, then use a gentle adhesive remover or rubbing alcohol to wipe away leftover glue. Avoid harsh chemicals that might damage the glass or leave streaks.
Sometimes, residue persists despite your efforts. In that case, carefully scrape it off with a plastic scraper or an old credit card to avoid scratching. Taking your time here prevents imperfections that can ruin your design.
Surface Preparation
Once the glass is clean and label-free, lightly sand any rough areas with fine-grit sandpaper. This creates a better surface for paint or glue to grip. Remember to wipe away sanding dust with a damp cloth afterward.
Consider if you want to add a primer or base coat, especially if you plan to paint your blocks. A primer improves adhesion and enhances color vibrancy. Think about your design and choose the best surface prep to match your creative vision.
Step-by-step Assembly Guide
Creating your own lighted glass block decoration can add a unique touch to any room. The assembly process is straightforward but requires careful attention to detail to ensure a polished look and safe operation. Follow this guide to build a stunning piece that lights up your space beautifully.
Arranging The Blocks
Start by choosing the glass blocks you want to use. Think about the design and how the blocks will fit together—do you want a simple row or a more complex shape? Lay them out on a flat surface to visualize the arrangement before gluing.
Consider the size and weight of each block. You might want to experiment with different configurations to see which one catches the light best. Can you imagine how the light will flow through your chosen pattern?
Installing The Lights
Next, pick the lighting option that suits your style—LED strip lights or fairy lights work well. Carefully insert the lights into the blocks, making sure the wiring is discreet and won’t be pinched when blocks are joined.
Test the lights before sealing everything in. This saves you from having to dismantle your work later. Have you checked if the brightness fits the mood you want to create?
Securing And Sealing
Use a clear, strong adhesive designed for glass to bond the blocks together. Apply the glue evenly to avoid gaps that might let dust or moisture inside. Press the blocks firmly but gently, so they stay aligned.
Once the adhesive dries, seal the edges with clear silicone caulk for extra protection. This step keeps the blocks stable and helps prevent any light leaks. Don’t rush the drying process—patience here means your decoration will last longer and look better.
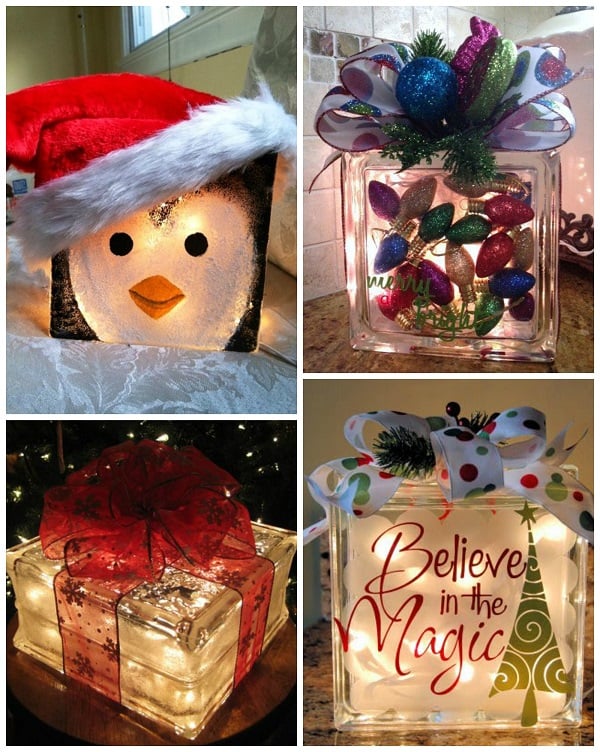
Creative Design Ideas
Creative design ideas can transform simple lighted glass block decorations into stunning focal points in your home or event. Your approach to design sets the mood and highlights the unique glow of the blocks. How you choose to arrange patterns, colors, and themes makes all the difference in creating a personalized and captivating display.
Themed Patterns
Themed patterns give your glass block decorations a clear purpose and visual story. Try arranging blocks to form shapes like stars, hearts, or geometric designs that reflect your style or the occasion. Using a stencil or tape can help you maintain clean lines and symmetry.
Think about layering patterns vertically or horizontally for added depth. Have you considered mixing clear blocks with frosted ones to create contrast within your design? This can make your pattern pop when the lights turn on.
Incorporating Colors
Adding color to your glass blocks instantly boosts their visual appeal. You can paint the blocks with glass paint or use colored LED lights inside for a softer glow. Don’t hesitate to combine multiple colors to create gradients or bold contrasts.
Try grouping blocks in a color wheel or a monochromatic scheme to suit your room’s decor. What if you matched the light colors to your favorite hues or seasonal trends? This adds a personal touch that guests will notice.
Seasonal And Festive Styles
Seasonal themes make your glass block decorations timely and festive. For winter, consider snowflake patterns or icy blue lighting. During holidays, use reds and greens or pumpkins and warm amber lights for autumn.
Layer festive elements like ribbons, small ornaments, or decals on the blocks for extra flair. How can you adapt your design to celebrate upcoming holidays or special events uniquely? Your creativity can turn simple blocks into memorable decorations.
Placement And Display Tips
Choosing the right spot for your lighted glass block decorations can make all the difference in how they enhance your space. Placement affects not only the visual appeal but also the atmosphere you create. Let’s look at how to display them effectively, considering where you plan to use them, how to highlight your décor, and keeping safety in mind.
Indoor Vs. Outdoor Use
Decide if your glass blocks will shine indoors or outdoors. Inside, they can brighten dark corners, shelves, or mantels, adding a cozy glow to living rooms or hallways.
Outdoors, they work well on patios, garden walls, or near walkways, creating inviting paths or accent lighting. But keep in mind outdoor blocks need to be weather-resistant and sealed properly to avoid moisture damage.
Think about how much natural light the area gets. Too much sunlight can lessen the glow effect during the day, so choose spots that come alive after dusk.
Highlighting Decor
Use your lighted blocks as focal points by pairing them with complementary décor. Place them next to plants, books, or artwork to draw attention without overpowering the space.
Try grouping several blocks together at varying heights for a dynamic look. You can stack them or line them up to create patterns that catch the eye.
Experiment with colored LED lights inside the blocks to match your room’s theme or the season. Warm tones add coziness, while cooler hues bring a modern vibe.
Safety Considerations
Never overlook safety when displaying illuminated decorations. Ensure all electrical components are rated for the intended environment—especially outdoors.
Keep cords and plugs away from water and high-traffic areas to prevent trips or electrical hazards. Use waterproof connectors if your blocks are outside.
Also, check that the blocks are stable on their surface to avoid tipping or falling. A simple non-slip mat underneath can secure them in place.
Have you noticed how a simple adjustment in placement can completely change the mood of a room? Your lighted glass blocks deserve a spot where they can truly shine and stay safe.

Credit: www.pinterest.com
Maintenance And Care
Maintaining your lighted glass block decorations ensures they stay bright and beautiful. Regular care helps prevent damage and keeps the lights shining longer. Simple cleaning and proper handling extend the life of your decoration.
Cleaning Lighted Blocks
Dust and dirt can dull the glass surface. Use a soft cloth or microfiber towel to wipe the blocks gently. Avoid harsh chemicals that may damage the glass or lights. A mix of mild soap and water works well for cleaning. Make sure to dry the blocks completely before turning the lights back on.
Replacing Lights
Lights inside glass blocks may need replacement over time. Use LED string lights or small battery-operated bulbs designed for glass blocks. Carefully open the block if possible, or access the lights from the back. Check the voltage and size to match the original bulbs. Dispose of old bulbs safely and test new lights before reinstalling.
Storage Tips
Store lighted glass blocks in a cool, dry place to avoid moisture damage. Wrap each block in soft cloth or bubble wrap to prevent scratches. Keep lights and cords separate to avoid tangling or damage. Label the storage box to find your decorations easily for the next use.

Credit: www.pinterest.com
Frequently Asked Questions
How Do You Light Up Glass Block Decorations?
Use LED string lights or battery-operated fairy lights inside the glass blocks. This creates a warm, glowing effect. Ensure the lights are waterproof and have a power source nearby for easy setup.
What Materials Are Needed For Glass Block Lighting?
You need glass blocks, LED lights, adhesive, power source, and decorative elements like colored stones or paint. These materials help create a safe and visually appealing lighted decoration.
Can I Customize My Lighted Glass Block Designs?
Yes, customize by adding colored lights, painting the blocks, or inserting decorative items inside. Personal touches enhance the aesthetic and make your decorations unique and stylish.
Is It Safe To Use Electrical Lights In Glass Blocks?
Yes, if you use low-voltage LED lights and waterproof components. Always follow safety guidelines to prevent overheating and electrical hazards in enclosed spaces.
Conclusion
Creating lighted glass block decorations adds charm to any space. The process is simple and fun to try. Choose your glass blocks and lights carefully for the best effect. Personalize your design to match your style and room. These decorations bring warmth and a cozy feeling inside.
Enjoy the soft glow and unique look they provide. Brighten your home with this easy, creative project today.