
Are you tired of plain, boring light switch covers that blend into your walls? What if you could turn those simple covers into eye-catching decor pieces that reflect your style?
Making decorative light switch covers is easier than you think, and it’s a fun way to add a personal touch to any room. You’ll discover simple, creative ideas that anyone can try—no special skills needed. Keep reading to transform your switches from dull to dazzling and make your space truly yours.
Materials Needed
Gathering the right materials sets the foundation for creating beautiful decorative light switch covers. Having everything at hand before you start keeps the process smooth and enjoyable. Whether you want a simple upgrade or a fully personalized design, the materials you choose will shape your final look.
Basic Supplies
- Plain Light Switch Covers:Start with a blank canvas. Plastic or metal covers work well depending on your design.
- Sandpaper:Lightly sanding the surface helps paint or glue stick better.
- Acrylic Paints or Spray Paint:Choose colors that match your room’s style or your creative vision.
- Paintbrushes:Various sizes let you add details or cover large areas smoothly.
- Mod Podge or Clear Sealer:This seals your design and protects it from wear and tear.
- Glue:A strong adhesive is essential if you plan to add any extra decorations.
- Screwdriver:To remove and reattach the switch covers safely.
Optional Decorative Items
- Stickers or Decals:Easy to apply and perfect for quick, eye-catching designs.
- Washi Tape:Adds patterns and colors without much effort or mess.
- Fabric or Scrapbook Paper:These can be cut to size and glued for a textured look.
- Rhinestones or Beads:Great for adding sparkle and dimension.
- Stencils:Use them to create precise shapes or letters on your cover.
- Ribbon or Twine:For wrapping edges or adding a rustic touch.
Think about what style fits your space. Do you want something subtle or bold? Having a clear idea will help you pick the best materials and make your project more fun.
Preparing The Switch Covers
Remove the switch cover carefully and clean it well. Dry it fully before adding any decorations. This helps paint or glue stick better.
Preparing the switch covers is a crucial step in decorating them. This ensures a smooth surface for artistic designs and durable finish. Proper preparation makes the painting process easier and yields stunning results. Follow these simple steps to get your switch covers ready for creativity.Cleaning And Sanding
Start by removing the switch covers from the wall. Lay them on a clean surface. Wipe off dust and dirt using a damp cloth. Use mild soap if needed for stubborn grime. Let them dry completely. Sand the surface gently with fine-grit sandpaper. This helps the paint adhere better. Pay special attention to edges and corners. A smooth surface is essential for a professional look.Priming For Paint
Priming is an important step before painting. Choose a primer suited for plastic surfaces. Apply a thin, even coat using a brush or spray. Allow the primer to dry completely. This usually takes about 30 minutes. Priming creates a uniform surface. It prevents paint from chipping or peeling. Now your switch covers are ready for artistic designs!Painting Techniques
Painting your decorative light switch covers opens up a world of creative possibilities. The techniques you choose can completely change the look and feel of a room. Whether you prefer a clean, classic style or something more playful, the right paint approach will make your covers stand out.
Solid Colors
Choosing solid colors gives your switch covers a sleek and modern appearance. Pick a shade that matches or contrasts with your wall paint to create a subtle or bold effect. Matte or glossy finishes can add different textures, so think about the vibe you want to set in your space.
Applying solid colors is straightforward. Use a foam brush or a small roller for smooth, even coats. Make sure to sand the surface lightly before painting to help the paint stick better. Have you ever noticed how a simple color change can refresh an entire room?
Patterns And Designs
Adding patterns and designs can turn your switch covers into mini works of art. Stripes, polka dots, or geometric shapes bring personality and interest to an otherwise overlooked spot. You don’t have to be an artist; even simple lines or dots can make a big difference.
Try using painter’s tape to create sharp edges or repeat shapes. You can layer colors once the first coat dries to add depth. Think about the style of the room—would a playful polka dot pattern fit better than bold stripes?
Using Stencils
Stencils are perfect if you want precise shapes or intricate designs without the mess. They help maintain clean lines and consistent patterns, even if you don’t have steady hands. Floral motifs, abstract shapes, or letters can all be painted easily using stencils.
Secure your stencil firmly with tape to avoid smudging. Dab paint lightly with a sponge instead of brushing to prevent bleeding underneath. Have you tried stencils before? They might just be the secret to a professional-looking finish on your covers.
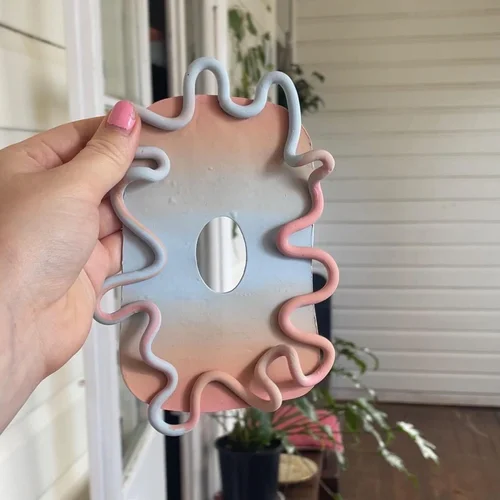
Credit: www.diydaisy.com
Adding Texture And Embellishments
Adding texture and embellishments brings life to plain light switch covers. These touches create depth and interest. They make your covers unique and personal. Simple materials can transform a basic switch into a decor highlight. Explore creative ways to add texture and sparkle.
Decoupage And Paper Art
Decoupage uses paper pieces glued onto the cover. Choose patterned or colored paper to match your room. Apply a thin layer of glue on the cover first. Smooth the paper carefully, avoiding wrinkles. Seal the paper with a clear finish for durability.
Paper art includes layering cutouts and shapes. Create designs with scrapbooking paper or old book pages. Mix colors and patterns for a playful effect. This technique adds visual texture and charm.
Using Fabric And Ribbon
Fabric adds softness and texture to switch covers. Cut fabric slightly larger than the cover size. Use fabric glue or spray adhesive to attach it firmly. Smooth out wrinkles and let it dry fully.
Ribbon can frame or decorate the edges. Wrap thin ribbons around the cover’s border. Secure ends with glue. Combine ribbons of different colors or textures for contrast.
Attaching Beads And Gems
Beads and gems add sparkle and dimension. Choose small beads or flat-backed gems for easy glue application. Arrange them in patterns or randomly for a natural look.
Use strong craft glue to fix each bead or gem. Press gently and let dry completely before use. These embellishments catch light and create eye-catching details.
Sealing And Finishing
Sealing and finishing your decorative light switch covers is the final step that protects your hard work and enhances the overall look. This process ensures your design lasts longer, resists wear, and maintains its vibrant colors. Taking time to choose the right materials and apply them carefully can make a big difference.
Choosing The Right Sealant
Picking the right sealant depends on the material of your cover and the look you want to achieve. Clear acrylic spray sealants work well for painted or decoupage covers, providing a smooth, durable finish.
If you’re working with wood, consider a polyurethane sealant for added protection against moisture and scratches. Glossy finishes brighten colors, while matte sealants offer a subtle, natural look.
Have you ever noticed how some covers peel or fade over time? That usually happens because the sealant wasn’t strong enough. Testing a small area first can save you from ruining your entire project.
Applying Protective Coating
Apply your sealant in a well-ventilated area to avoid inhaling fumes. Hold the spray can about 6-8 inches from the cover and use even, sweeping motions to prevent drips or uneven spots.
Allow each coat to dry completely before adding another; usually, two to three thin coats offer the best protection without masking your design. Patience here pays off, especially if you want a smooth, professional finish.
For brush-on sealants, use a soft brush and apply thin layers to avoid streaks. Remember, rushing this step can cause bubbles or tacky surfaces that ruin your cover’s appearance.
What’s your favorite finish—glossy, matte, or satin? Trying different options on scrap pieces can help you discover what works best for your style and space.

Credit: www.facebook.com
Creative Theme Ideas
Choosing a creative theme for your decorative light switch covers can turn a simple fixture into a standout piece. Themes add personality and can reflect your style or the vibe of the room. Let’s look at some inspiring ideas that you can easily adapt to your space and taste.
Nature-inspired Covers
Nature-themed covers bring a calming effect to any room. You could paint delicate leaves or flowers directly on the cover or use pressed flowers under a clear coat for a textured finish.
Think about using small pebbles or sand glued around the edges for a beachy feel. How about a cover shaped like a butterfly or a tree silhouette? These subtle touches can make your switch cover a tiny tribute to the outdoors.
Vintage And Retro Styles
Vintage covers add a touch of nostalgia and charm. Try decoupaging old book pages, sheet music, or vintage maps onto the switch cover for an instant retro vibe.
Another idea is to use antique-style knobs or tiny frames around the switch for a Victorian look. You can even paint polka dots or stripes reminiscent of the 1950s to brighten up a dull wall.
Holiday And Seasonal Designs
Holiday-themed covers are fun and easy to update throughout the year. You can paint pumpkins for fall, snowflakes for winter, or flowers for spring, giving your space a fresh look with each season.
Consider using small decorations like miniature ornaments or leaves glued onto the cover for added texture. Does your family have a favorite holiday tradition? Let that inspire your design to make it truly meaningful.
Safety Tips
Safety is the top priority when making decorative light switch covers. These projects involve electrical parts that can be dangerous. Taking the right precautions protects you and your home. Follow these essential tips to keep the process safe and smooth.
Working Around Electrical Components
Always turn off the power at the circuit breaker before starting. Use a voltage tester to confirm the electricity is off. Avoid touching wires or terminals with bare hands. Work in a well-lit area to clearly see all parts. Keep tools dry and insulated to prevent shocks. Never rush; take your time to avoid mistakes.
Proper Installation
Check that the switch cover fits snugly without forcing it. Use the correct screws to secure the cover firmly. Avoid over-tightening screws to prevent damage. Make sure no wires are pinched or exposed after installation. Test the switch after installation to ensure it works safely. Replace any damaged parts before finishing the project.
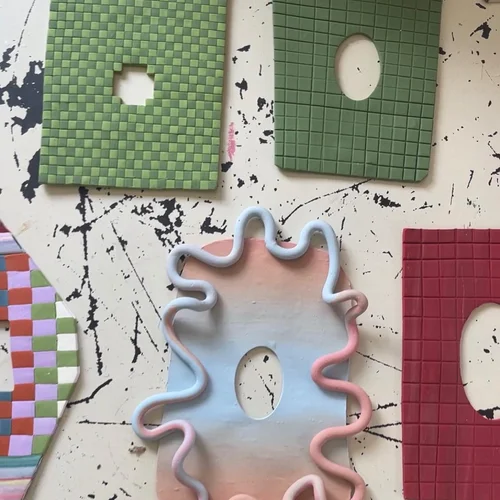
Credit: www.diydaisy.com
Frequently Asked Questions
How Do I Start Making Decorative Light Switch Covers?
Begin by choosing a plain switch cover and your preferred decorating materials. Clean the cover, then apply paint, fabric, or decoupage for a unique look. Let each layer dry fully before adding more details or sealing the design.
What Materials Work Best For Light Switch Cover Decoration?
Common materials include acrylic paint, patterned paper, fabric, stickers, and washi tape. Use a clear sealant to protect your design. Avoid materials that are too thick or could interfere with the switch’s function.
Can I Customize Light Switch Covers For Any Room Style?
Yes, customize covers to match any room décor. Use colors, patterns, and themes that complement your space. This simple change can enhance room aesthetics and add a personal touch.
How Do I Safely Remove And Replace Switch Covers?
Turn off power at the circuit breaker. Use a screwdriver to remove screws and gently pull off the cover. After decorating, reattach the cover and restore power. Always ensure safety first.
Conclusion
Decorating light switch covers adds charm to any room. It’s a simple way to show creativity. Choose colors and patterns that match your style. Use easy materials found at home or stores. Small changes can make a big difference in space.
Enjoy the process and have fun designing. This craft fits all skill levels and ages. Try it today and brighten up your walls.