Wiring a decorator light switch might sound tricky, but with the right steps, you can do it yourself and save money. Imagine controlling your lights with a sleek, modern switch that fits perfectly in your home.
You don’t need to be an expert electrician to get it right. This guide will walk you through the process, making it simple and safe. By the end, you’ll feel confident handling your own light switch installation. Ready to upgrade your lighting and take control?
Let’s get started!

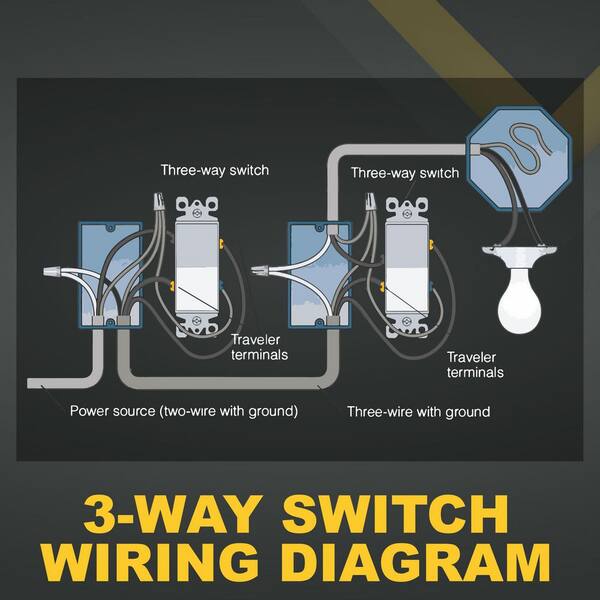
Credit: www.amazon.com
Tools And Materials Needed
Wiring a decorator light switch can be a straightforward task, especially when you have the right tools and materials on hand. Gathering everything you need beforehand not only saves time but also ensures safety and efficiency in your project. Let’s dive into the essentials you’ll need to get started.
Essential Tools
- Screwdriver Set:A flathead and Phillips screwdriver will help you remove the old switch and secure the new one.
- Wire Strippers:These are crucial for stripping the insulation off the wires without damaging them.
- Voltage Tester:Safety first! Ensure the power is off before you start working.
Necessary Materials
- Decorator Light Switch:Choose a switch that suits your style and matches the existing fixtures.
- Electrical Tape:Use this to wrap wire connectors for added safety.
- Wire Nuts:These secure the wire connections, preventing them from coming loose.
Additional Supplies
- Faceplate:A new faceplate can refresh the look of your switch and wall.
- Labeling Tape:Handy for marking wires if you’re dealing with multiple connections.
Have you ever found yourself halfway through a project only to realize you’re missing a key tool? It can be frustrating. By preparing with these tools and materials, you ensure a smooth and successful installation process. Are there any other tools you find indispensable when working on similar projects?
Safety Precautions
Handling electrical wiring requires more than just technical know-how—it demands strict attention to safety. Before you start wiring a decorator light switch, you must protect yourself and your home from potential hazards. Taking the right safety precautions can save you from costly damages and serious injuries.
Turn Off The Power At The Circuit Breaker
Never rely on just the wall switch to cut the power. Go directly to your circuit breaker panel and switch off the power to the room where you’ll be working. This simple step ensures you won’t get an electric shock while handling wires.
Have you ever underestimated how dangerous even a small spark can be? Taking this precaution seriously is the foundation of safe wiring.
Use A Voltage Tester To Confirm Power Is Off
Even after switching off the breaker, always test the wires with a voltage tester. This tool confirms there’s no electricity running through the wires. It’s a quick check that provides peace of mind before you touch anything.
Using a voltage tester can save you from unexpected shocks. It’s a small investment with a big payoff in safety.
Wear Proper Safety Gear
Protect yourself with insulated gloves and safety goggles. Gloves reduce the risk of electric shock, while goggles shield your eyes from sparks or debris. These items are easy to overlook but crucial for safe wiring.
Have you thought about how a tiny metal fragment could cause injury during wiring? Safety gear guards you against such surprises.
Work In A Dry Environment
Water and electricity don’t mix. Always ensure your hands are dry, and avoid working in damp areas. Moisture increases the risk of electric shock significantly.
Before you start, double-check the workspace for leaks or spills. This precaution is often ignored but essential.
Keep Your Work Area Organized
Clutter can cause accidents. Keep your tools and wires neatly arranged to avoid tripping or accidental contact with live wires. An organized workspace helps you focus on the task safely and efficiently.
Have you ever found yourself fumbling with tangled wires? Taking a moment to organize can prevent costly mistakes.
Types Of Decorator Light Switches
Decorator light switches come in various types, each designed to meet different lighting needs and preferences. Understanding these types helps you choose the right switch for your wiring project and ensures smooth installation. Let’s look at the most common types and how they differ in function and wiring.
Single-pole Decorator Switches
Single-pole switches control one light or a group of lights from a single location. They are the simplest type and the easiest to wire. If you want to replace a basic switch with a sleek decorator style, this is likely what you’ll use.
Three-way Decorator Switches
Three-way switches let you control a light from two different locations—perfect for hallways or large rooms. Wiring these is a bit more complex since they require an additional traveler wire. Have you ever wondered how your stairway lights work from both top and bottom? That’s a three-way switch setup.
Four-way Decorator Switches
Four-way switches work with two three-way switches to control a light from three or more locations. They’re less common in homes but essential in large spaces with multiple entrances. Wiring four-way switches requires careful attention to traveler wires and proper connections.
Dimmer Decorator Switches
Dimmer switches allow you to adjust light brightness rather than just turning it on or off. Many decorator switches come with dimmer options, combining style with function. If you want mood lighting or energy savings, a dimmer switch is a smart choice.
Smart Decorator Switches
Smart switches connect to your home Wi-Fi and let you control lights via apps or voice commands. Wiring is similar to traditional switches but may require a neutral wire. Have you considered how smart switches could simplify your daily routines?
Identify Your Wiring Setup
Before you start wiring a decorator light switch, it’s crucial to identify your wiring setup. Knowing exactly what kind of wiring you have makes the whole process smoother and safer. It helps prevent common mistakes that can cause electrical hazards or malfunctioning switches.
Check The Power Source Location
First, figure out where the power is coming from. Is the power feeding into the switch box or the light fixture box? This detail matters because it determines how you connect your wires.
Look inside the switch box for a black (hot) wire coming in. If you see it there, the power is at the switch. If not, the power might be at the light fixture instead.
Identify Your Wires By Color
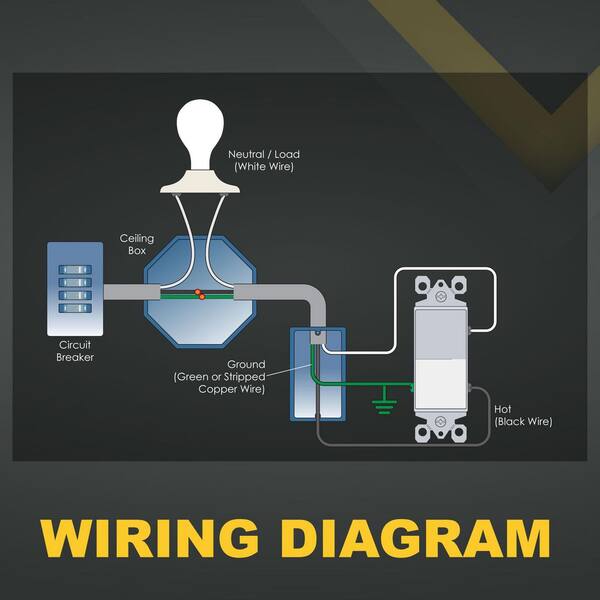
Wires usually come in standard colors, but always double-check. The black wire is typically the hot wire carrying power, white is neutral, and green or bare copper is ground.
Sometimes, you might find a red wire, especially in setups with three-way switches. Knowing what each wire does will help you connect your decorator switch correctly.
Use A Voltage Tester For Safety
Never trust wire colors alone. Use a voltage tester to confirm which wire is live before you touch anything. This simple step can save you from shocks and ensure you connect the switch to the right wire.
Look For Existing Switch Types
Take note if you’re replacing a single-pole or a three-way switch. A decorator switch might work differently depending on the existing setup.
Knowing this will guide you on how to hook up the traveler wires or if you only need to connect two wires.
Document Your Findings
Take photos or write down what you discover about your wiring. This makes it easier to reference later and can be a lifesaver if you need to ask for help.
Have you ever started a project only to get stuck because you forgot what wires connected where? Avoid that frustration by keeping a clear record.
Turn Off Power Supply
Turning off the power supply is the first and most important step before wiring a decorator light switch. This action keeps you safe from electric shocks while working. Always treat electrical circuits with caution. Never skip this step, no matter how small the task seems.
Power can be turned off at the main electrical panel or circuit breaker box. This stops electricity from reaching the switch and wiring. Double-checking that the power is off is critical. Use a voltage tester or a simple light tester to confirm no current flows through the wires.
Locate The Circuit Breaker
Find the main electrical panel in your home. It is usually in the basement, garage, or utility room. Open the panel door and look for the circuit breaker switches. Identify the breaker that controls the room with the light switch you want to wire.
Switch Off The Correct Breaker
Flip the identified breaker switch to the “off” position. This stops the electrical current to the light switch circuit. Be sure to turn off the right breaker to avoid unnecessary power loss in other areas.
Test The Power Supply
Use a voltage tester to check the wires at the light switch box. Touch the tester probes to the wires carefully. If the tester does not light up or beep, the power is off. This confirms your safety before starting the wiring process.
Use Safety Precautions
- Wear rubber-soled shoes to reduce shock risk.
- Stand on a dry, insulated surface.
- Use insulated tools designed for electrical work.
- Keep your hands dry and avoid touching metal surfaces.

Credit: www.ebay.com
Remove Old Switch
Removing the old switch is the first task before installing a decorator light switch. This step makes sure the new switch fits properly and works safely. Take your time and follow safety tips carefully.
Turn Off Power At The Circuit Breaker
Locate the circuit breaker panel in your home. Switch off the breaker that controls the light switch. Double-check by trying to turn on the light. No power means it is safe to work.
Remove The Switch Cover Plate
Use a screwdriver to remove the screws holding the cover plate. Keep the screws in a safe place for later. Gently pull off the cover plate to expose the switch.
Unscrew The Old Switch From The Wall Box
Find the screws that attach the switch to the wall box. Use a screwdriver to remove these screws. Carefully pull the switch out to see the wires behind it.
Note Wire Connections Before Removal
Look closely at how wires connect to the old switch. Take a picture or write down the wire positions. This helps connect the new switch correctly.
Disconnect The Wires From The Old Switch
Loosen the terminal screws or release the wires from push-in connectors. Gently remove each wire without damaging it. Keep wires separated to avoid confusion.
Connect Wires To New Switch
Connecting the wires to your new decorator light switch is where the real action happens. This step requires attention to detail and safety, but it’s straightforward once you understand each wire’s role. Let’s dive into how to properly attach the ground, line, load, and neutral wires to ensure your switch works perfectly and safely.
Attach Ground Wire
The ground wire is your switch’s safety net. It’s usually a bare copper wire or green insulated wire. Locate the green screw or grounding terminal on your switch.
Wrap the ground wire around this screw clockwise and tighten it firmly. This connection reduces the risk of electrical shock and helps protect your home’s wiring system. If your switch box has a grounding screw, attach the ground wire there too for extra safety.
Connect Line And Load Wires
Identifying the line and load wires is crucial. The line wire brings power from your electrical panel, while the load wire sends power to your light fixture. Usually, the line wire is black and comes from the circuit breaker.
Attach the line wire to the terminal labeled “Line” or “Power In” on the switch. Connect the load wire to the terminal marked “Load” or “Light.” Make sure the screws are tight to avoid loose connections, which can cause flickering or failure.
Handle Neutral Wire
Not all decorator switches require a neutral wire, but many modern ones do. The neutral wire is typically white and completes the circuit by carrying current back to the electrical panel. If your switch has a neutral terminal, connect the neutral wire here.
If your switch box has multiple neutral wires bundled together, you may need to add a pigtail—a short wire connecting the bundle to the switch’s neutral terminal. If you’re unsure whether your switch needs a neutral connection, check the manufacturer’s instructions carefully. Missing this step can prevent your switch from working at all.
Secure The Switch And Cover Plate
Securing the decorator light switch and its cover plate is a crucial step that ensures safety and gives your installation a clean, finished look. Improperly secured switches can lead to loose wiring, which might cause flickering lights or even electrical hazards. Taking the time to fasten everything firmly not only protects your home but also makes your switch feel solid every time you use it.
Check The Alignment Of The Switch
Before tightening any screws, make sure the switch sits flush against the wall box. If the switch is crooked, it will be noticeable once the cover plate is on and can cause the plate to sit unevenly.
Adjust the switch by gently pushing or pulling it so that it lines up perfectly with the edges of the wall box. This small adjustment makes a big difference in the overall appearance.
Tighten The Mounting Screws Securely
Use a screwdriver to tighten the screws that hold the switch to the electrical box. Don’t overtighten, as this can crack the switch or strip the screw holes.
Firmly tightened screws keep the switch from moving when you flip it. This stability helps prevent wear on the wiring connections inside.
Attach The Decorator Cover Plate
Place the cover plate over the switch, aligning the screw holes on the plate with those on the switch. This step completes the look and adds a layer of protection.
Secure the cover plate with the screws provided. Make sure the plate is tight but not forced, as this can cause cracking or warping.
Verify The Switch Operation And Appearance
Once everything is secured, test the switch to ensure it works smoothly and feels solid. A loose or wobbly switch often signals that something needs tightening.
Look closely at the cover plate—are there gaps or uneven edges? If so, loosen the screws slightly and readjust for a perfect fit.
Have you ever noticed how a perfectly aligned switch and cover plate can elevate the look of a room? Taking the time to secure everything properly not only improves function but also adds to your home’s style.
Restore Power And Test Switch
After wiring your decorator light switch, the next crucial step is to restore power safely and test the switch. This stage confirms whether your connections are correct and the switch functions as expected. It’s your moment to see your work come to life, but safety remains a top priority.
Turn The Circuit Breaker Back On
Locate the circuit breaker panel and switch on the breaker that controls the light switch you just wired. This restores electrical power to the circuit.
Be sure to stand clear of any exposed wires while doing this to avoid accidental shocks. If you’re unsure which breaker controls your switch, turn them on one at a time to identify the right one.
Test The Decorator Light Switch
Flip the switch up and down to check if the light turns on and off smoothly. If the light responds correctly, your wiring is successful.
Does the light flicker, fail to turn on, or behave oddly? If yes, turn off the breaker immediately and recheck your wiring connections. Loose or reversed wires often cause these issues.
Use A Voltage Tester For Extra Safety
Even after restoring power, it’s wise to use a voltage tester to ensure no live wires are exposed where they shouldn’t be. Testing around the switch terminals can confirm safe installation.
This step helped me avoid a potential shock once when a wire wasn’t fully secured. It’s a simple tool that adds an important layer of safety to your project.
Double-check Switch Operation Under Different Conditions
Test the switch multiple times and under different lighting conditions to ensure reliable operation. Turn lights off during daylight and on at night to confirm consistent performance.
Have you noticed switches that work intermittently? Such issues often point to wiring problems or faulty switches that may need replacement.
Credit: www.homedepot.com
Troubleshooting Common Issues
Troubleshooting common problems is a key part of wiring a decorator light switch. Some issues occur often and can be fixed quickly. Knowing how to identify these problems saves time and effort. This section helps solve typical wiring issues with clear tips.
Checking For Loose Connections
Loose wires cause flickering or no light at all. Turn off the power before checking. Look closely at each wire connection. Tighten any screws holding the wires in place. Make sure wires are wrapped around terminals correctly. A secure connection ensures proper switch function.
Testing The Switch With A Voltage Tester
A voltage tester shows if power reaches the switch. Place the tester on the wires with the power on. If no voltage appears, the problem lies in the wiring or circuit breaker. This test helps find where power stops. It is a simple way to check switch operation safely.
Identifying Incorrect Wire Placement
Wires must connect to the right terminals. Decorator switches often have specific places for line, load, and ground wires. Mixing these wires causes the switch not to work. Use the switch manual or labels on wires for guidance. Correct placement solves many wiring problems.
Checking For Faulty Switch Components
Sometimes the switch itself is defective. Signs include a switch that feels loose or does not click. Replace the switch with a new one if problems continue after wiring checks. Testing with a multimeter can also verify switch function. A faulty switch must be swapped out.
Ensuring Proper Grounding
Ground wires protect against electrical faults. Make sure the ground wire connects to the green screw or grounding terminal. A missing ground connection can cause safety risks and switch failure. Check the ground wire for damage or looseness. Proper grounding is crucial for safe wiring.
Tips For Maintaining Your Light Switch
Maintaining your light switch is a crucial aspect of ensuring it remains functional and safe. Regular attention to small details can prevent unexpected electrical issues and extend the lifespan of your switch. These tips will guide you on how to keep your decorator light switch in top condition.
Regular Cleaning
Dust and dirt can accumulate on your light switch over time. Use a damp cloth to gently wipe the surface regularly. Avoid using harsh chemicals as they can damage the finish. A clean switch not only looks better but also operates more smoothly.
Inspect For Loose Connections
Check if the switch feels loose or wobbly. Tighten the screws if necessary to ensure it is securely attached. Loose connections can lead to poor performance or even pose a safety risk. Having a firm switch can also be satisfying as it gives a sense of reliability.
Test The Switch Periodically
Regular testing can help you catch potential issues early. Turn the switch on and off a few times to ensure it’s working properly. Listen for any unusual sounds or feel for any resistance. Such tests can be surprisingly revealing about the health of your switch.
Replace Faulty Switches
If the switch is not functioning correctly, consider replacing it. A faulty switch can affect your home’s lighting efficiency and safety. It’s better to replace it sooner rather than later to avoid inconvenience or hazards. Would you prefer a quick fix or a lasting solution?
Consult A Professional
If you’re unsure about the condition of your switch, seek advice from an electrician. They can provide insights into whether your switch needs repair or replacement. Professional guidance can be invaluable, especially if you’re not familiar with electrical components. What’s your peace of mind worth?
By following these tips, you can ensure that your decorator light switch remains in optimal condition, providing reliable service and safety for your home.
Frequently Asked Questions
What Tools Do I Need To Wire A Decorator Switch?
You need a screwdriver, wire stripper, voltage tester, and wire nuts. These tools ensure safe and proper installation of the switch.
How Do I Identify Wires For A Decorator Switch?
Look for live (hot), neutral, and ground wires. Use a voltage tester to confirm live wires before connecting.
Can I Replace A Standard Switch With A Decorator Switch?
Yes, decorator switches can replace standard switches. Make sure wiring matches and power is off before installation.
Is It Safe To Wire A Decorator Switch Myself?
Yes, if you follow safety guidelines and turn off power. If unsure, consult a licensed electrician to avoid hazards.
Conclusion
Wiring a decorator light switch is easier than it seems. Follow each step carefully and stay safe. Double-check your connections before turning the power back on. Take your time and use the right tools. This simple project can improve your home’s lighting style.
Practice makes perfect, so don’t rush. Soon, you will feel confident handling basic electrical tasks. Keep learning and stay curious. Your home projects will get easier with experience.