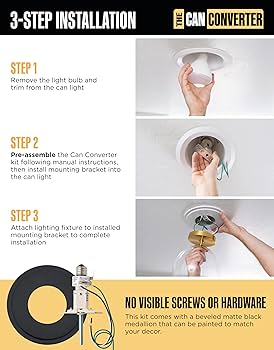
Are you struggling to remove the decorative cover from your can light? It might seem tricky at first, but with the right steps, you can do it quickly and safely.
Whether you want to replace the cover, clean it, or upgrade your lighting, knowing how to take it off is the first step. You’ll discover simple tips and easy-to-follow instructions that make the process hassle-free. Keep reading to find out exactly what you need to do to remove your can light decorative cover without any damage or frustration.

Credit: decorativelightcovers.com
Tools Needed
Removing a can light decorative cover is easier when you have the right tools on hand. Having these tools ready saves time and prevents damage to your light fixture or ceiling. Let’s look at the basic tools you’ll need to get the job done smoothly and safely.
Basic Tools For Removing Can Light Covers
- Screwdriver:Most decorative covers are held by screws. A flathead or Phillips screwdriver is usually all you need.
- Step Ladder:Can lights are often on ceilings, so a sturdy step ladder helps you reach them comfortably.
- Gloves:Protect your hands from sharp edges or dust by wearing work gloves.
Additional Helpful Tools
- Putty Knife or Plastic Pry Tool:If the cover is clipped in place, a gentle pry tool can help loosen it without damage.
- Flashlight:Lighting up the area lets you see screws or clips more clearly, especially in dim rooms.
- Magnet on a Stick:This handy tool can retrieve any dropped screws or small parts from high spots.
Why Having The Right Tools Matters
Using the wrong tools can lead to stripped screws or broken covers, increasing your workload. I once tried removing a cover without a screwdriver and ended up scratching the ceiling. Having the proper tools made the second attempt quick and damage-free. What’s your experience with tackling small home repairs—have you ever skipped a tool and paid the price?
Safety Precautions
Turn off the power to avoid electric shock before removing the can light cover. Use a sturdy ladder and handle the cover gently to prevent damage or injury.
Before you start removing the can light decorative cover, prioritize safety. Proper precautions prevent accidents and ensure a smooth process. Handling electrical fixtures requires careful attention. Below, find essential safety steps for a safe experience.Turn Off The Power
Switch off the power at the circuit breaker. Verify the light is off by flipping the wall switch. Ensure no electricity flows to the fixture.Use A Stable Ladder
Select a sturdy ladder that reaches the ceiling. Place it on a flat surface. Test stability before climbing to avoid falls.Wear Safety Gear
Put on gloves to protect your hands. Wear safety goggles to shield your eyes from dust or debris. Appropriate gear helps prevent injuries.Check For Loose Fixtures
Inspect the light fixture for any looseness. Secure any loose parts before proceeding. This prevents unexpected falls during removal.Work In A Well-lit Area
Ensure the area is well-lit for clear visibility. Use a flashlight if necessary. Good lighting aids in careful handling.Ensure Dry Hands
Keep your hands dry to avoid slipping. Wet hands increase the risk of dropping tools or parts. Dry hands enhance grip and control. By following these precautions, you can remove the decorative cover safely. Remember, safety first in every step.Identify Your Can Light Cover Type
Before removing a can light decorative cover, identify its type. Different covers attach in various ways. Knowing the type helps avoid damage to the cover or fixture. This guide explains common can light cover types to make removal easier.
Spring Clips
Spring clip covers hold tightly with metal clips on each side. They fit inside the can light housing. Press the clips inward to release the cover. The cover then slides out easily. These clips provide a snug fit without screws or adhesives.
Twist-on Covers
Twist-on covers attach by rotating them clockwise or counterclockwise. Look for small tabs or grooves along the cover’s edge. To remove, grip the cover firmly and twist in the opposite direction of installation. This type often locks into place to prevent falling.
Snap-on Covers
Snap-on covers click into place with plastic or metal tabs. Gently pull the cover outward while pressing the tabs. The cover should pop free without much force. Snap-on covers are common in newer fixtures and are easy to remove with care.

Credit: www.youtube.com
Turn Off Power
Before you even think about removing the decorative cover from your can light, turning off the power is an essential safety step. Handling electrical fixtures without cutting the power can lead to shocks or damage to the light. It’s a simple precaution that protects both you and your home.
Locate The Correct Circuit Breaker
Start by finding the circuit breaker that controls the lighting in the room where the can light is installed. Most homes have a labeled breaker panel; if yours isn’t labeled, you may need to switch off breakers one at a time. This ensures the right circuit is powered down without affecting other areas unnecessarily.
Use A Voltage Tester For Confirmation
Even after switching off the breaker, it’s smart to double-check with a voltage tester. This small device confirms that no electricity is flowing to the light fixture. It’s a quick step that avoids surprises and gives you peace of mind before you begin.
Inform Others In Your Household
Let everyone in your home know you’re turning off the power to avoid accidental reactivation. This can prevent interruptions and keeps everyone safe. A quick heads-up helps maintain a smooth process while you work on the light cover.
Consider Turning Off The Main Power For Extra Safety
If you’re unsure about which breaker controls the light or if your panel is confusing, shutting off the main power is an option. It’s a bit more drastic but guarantees no electricity is flowing anywhere. Just remember to reset everything once your work is done.
Remove Spring Clip Covers
Removing spring clip covers from can lights is simple with the right approach. These covers use small metal clips to hold them in place. Understanding how to release these clips helps you remove the cover safely. Always handle the clips gently to avoid damage.
Locate The Spring Clips
Look inside the can light housing. You will see two or more metal spring clips. These clips hold the cover tightly against the ceiling. Identifying their position is key before trying to remove the cover.
Press The Clips Inward
Use your fingers to press the spring clips toward the center of the light. The clips will compress inward, loosening their grip. This step requires steady pressure but not too much force.
Pull The Cover Down Carefully
While keeping the clips compressed, gently pull the decorative cover downward. The cover should slide free from the ceiling. Avoid twisting or bending the cover as you remove it.
Store The Cover And Clips Safely
Place the cover and clips in a safe spot. This prevents loss or damage. You will need them again when reinstalling the can light cover.
Remove Twist-on Covers
Removing twist-on can light covers is often easier than you expect. These covers are designed to be user-friendly, allowing you to access the bulb or fixture inside quickly. But if you’re unsure how to handle the twist-on mechanism, it can feel tricky at first.
Identify The Twist-on Cover
Start by confirming the cover twists off rather than snaps or pulls off. Twist-on covers usually have a visible ridge or grip area around the edge. This design helps you get a firm hold to turn the cover without slipping.
Prepare Your Hands And Tools
Make sure your hands are dry to avoid slipping. If the cover feels stuck, use a rubber glove or a piece of cloth for extra grip. Avoid using metal tools that can damage the cover or the light fixture.
Twist The Cover Counterclockwise
Grip the cover firmly and turn it counterclockwise. Don’t force it too hard—if it doesn’t move, try wiggling it gently while turning. Sometimes, dust or paint can cause the cover to stick, so patience is key.
Handle Stubborn Covers With Care
If the cover won’t budge, try a little warm water on a cloth to loosen any debris or paint. Avoid using harsh chemicals that can damage the fixture. Remember, the goal is to protect your light fixture while removing the cover.
Check For Hidden Clips Or Screws
Sometimes twist-on covers have hidden clips or screws that secure them in place. Look carefully around the rim for any small fasteners before applying extra force. Removing these first can save you from damaging the cover or fixture.
Store The Cover Safely
Once removed, place the cover somewhere safe and clean. Keeping it in good condition makes reinstallation easy later. Have you ever lost a cover and struggled to find a replacement? Avoid that hassle by storing it carefully.
Remove Snap-on Covers
Removing snap-on covers from can lights is a simple task. These covers protect the bulb and add a decorative touch. Over time, you may need to remove them for cleaning or replacement. Snap-on covers fit tightly but can be taken off without tools. Knowing how to remove them safely prevents damage to the cover or light fixture.
Locate The Edges Of The Snap-on Cover
Look closely around the can light to find the cover edges. Most snap-on covers have small tabs or lips where you can grip. These edges are usually near the rim of the light. Identifying the right spot makes removal easier and safer.
Use Your Fingers To Gently Pry The Cover
Place your fingers around the edge of the cover. Apply gentle pressure to lift one side of the cover. Avoid pulling too hard to prevent breaking the plastic. The cover should start to pop away from the fixture.
Work Around The Cover Evenly
After lifting one side, move your fingers around the cover. Carefully pry each side in a balanced way. This helps loosen the cover evenly without bending it. Continue until the cover comes free from the light housing.
Handle The Cover With Care
Once removed, place the cover on a soft surface. Snap-on covers can be fragile and may crack if dropped. Clean the cover gently with a soft cloth if needed. Proper handling keeps the cover in good shape for reinstallation.

Credit: www.youtube.com
Clean And Maintain Covers
Keeping can light decorative covers clean helps maintain their look and function. Dust and grime build up over time. Regular cleaning stops damage and keeps covers bright. Proper care extends their life and saves money. This section guides easy ways to clean and maintain covers safely.
Remove Dust Gently
Use a soft cloth or microfiber duster to wipe covers. Avoid rough materials that scratch the surface. Dust covers weekly to prevent buildup. A gentle brush can reach small crevices.
Use Mild Cleaning Solutions
Mix warm water with a few drops of mild soap. Dampen a cloth with the solution and wipe the cover. Do not soak covers, as water may damage them. Dry covers with a clean, soft cloth.
Check For Damage Regularly
Inspect covers for cracks or loose parts during cleaning. Tighten screws if needed. Replace damaged covers to avoid safety risks. Proper upkeep keeps covers secure and functional.
Maintain Shine And Color
Apply a small amount of furniture polish on a soft cloth. Rub gently to restore shine on metal or plastic covers. Avoid harsh chemicals that fade color or damage finish.
Schedule Deep Cleaning
Set a routine for thorough cleaning every few months. Remove covers carefully before washing. Clean both inside and outside surfaces. This keeps covers looking fresh and new longer.
Troubleshooting Stuck Covers
Stuck can light decorative covers can be surprisingly stubborn. You might try pulling gently, only to find them firmly in place. This issue often arises from paint buildup, dust, or even slight warping of the cover or fixture.
Before you force anything, consider what might be causing the resistance. Is the cover painted shut? Has dust created a sticky layer? Or is the cover simply wedged tightly due to age or installation quirks? Understanding these factors helps you avoid damage to your fixture or ceiling.
Identifying The Cause Of The Stuck Cover
Start by examining the edges of the cover closely. Look for signs of paint, debris, or any visible damage. Sometimes, paint can act like glue, sealing the cover in place without you realizing it.
Feel around for any gaps or uneven spots that might indicate warping. This can explain why the cover doesn’t budge even with steady pressure.
Using Gentle Tools To Loosen The Cover
Try a plastic putty knife or a thin, flat tool to gently pry around the edges. Avoid metal tools that can scratch or dent the cover. Insert the tool slowly and carefully to create a small gap.
Once you have a little space, use your fingers to wiggle the cover loose. If it resists, stop and try another spot instead of forcing one area.
Applying Heat Or Solvents Safely
Applying a little warmth can sometimes soften dried paint or adhesive. Use a hairdryer on a low setting, moving it evenly around the cover for a few minutes. Be cautious not to overheat and damage the fixture.
If paint is the culprit, a tiny amount of rubbing alcohol on a cloth can help loosen it. Test in a small, hidden area first to avoid any damage.
Preventing Damage During Removal
- Wear gloves to protect your hands from sharp edges.
- Support the fixture or ceiling around the cover to avoid cracks.
- Work slowly and patiently—rushing can cause breaks or scratches.
Have you ever pulled too hard on a stuck cover and ended up with a bigger problem? Taking time now can save you from costly repairs later.
Frequently Asked Questions
How Do I Safely Remove A Can Light Decorative Cover?
Turn off the power before starting. Gently twist or pull the cover. Use a ladder for better reach. Avoid forcing it to prevent damage.
What Tools Do I Need To Remove Can Light Covers?
Most covers can be removed by hand. Sometimes a flathead screwdriver helps. Use gloves to protect your hands from sharp edges.
Can I Replace The Decorative Cover After Removal?
Yes, you can replace it with a new or cleaned cover. Ensure it fits properly and is securely attached to avoid hazards.
How Do I Clean Can Light Decorative Covers?
Remove the cover carefully. Use a mild soap solution and a soft cloth. Dry completely before reinstalling to prevent moisture damage.
Conclusion
Removing a can light decorative cover is simple with the right steps. Gently pull or twist the cover to avoid damage. Keep safety in mind by turning off the power first. Use a ladder carefully for high fixtures. Clean the cover before putting it back or replacing it.
Taking your time helps prevent accidents or breaks. Now, you can update or fix your lighting with ease. This small task improves your room’s look and feel quickly.