Are you ready to give your room a fresh, stylish look without a full renovation? Installing a decorative light over your existing junction box is a simple way to brighten up your space and add a touch of personality.
You might think this task is complicated or requires a professional, but with the right steps, you can do it yourself safely and confidently. Keep reading, and you’ll discover easy-to-follow tips that will help you transform your lighting quickly and beautifully.
Your home deserves that glow-up—let’s make it happen!
Credit: www.diychatroom.com
Tools And Materials Needed
Before you begin installing a decorative light over an existing junction box, gathering the right tools and materials is essential. Having everything ready not only speeds up the process but also ensures safety and a professional finish. Let’s break down what you’ll need to tackle this project with confidence.
Basic Electrical Tools
- Screwdrivers:Both flathead and Phillips screwdrivers help with removing the old fixture and securing the new one.
- Wire Strippers:These make it easy to strip insulation from wires without damaging the copper inside.
- Voltage Tester:Always test the wires to ensure the power is off before touching anything.
- Pliers:Needle-nose pliers help twist wires together neatly and securely.
- Electrical Tape:Use this to insulate wire connections for added safety.
Having these tools on hand will make your installation smoother and help you avoid common mistakes like stripped screws or damaged wires.
Decorative Light Fixtures
- Fixture Type:Choose a light that fits your room’s style and the size of your junction box.
- Mounting Hardware:Ensure the fixture comes with all screws, brackets, and anchors needed for installation.
- Bulbs:Select the right type and wattage recommended for your fixture to avoid overheating or under-lighting.
Remember, the right fixture can transform your space. Have you picked one that complements your existing decor while fitting securely over the junction box?
Safety Gear
- Insulated Gloves:Protect your hands from accidental electric shocks.
- Safety Glasses:Shield your eyes from dust or debris during installation.
- Ladder or Step Stool:Use a stable platform to reach the junction box comfortably and safely.
Safety gear is not optional. It’s your first line of defense. Have you ever underestimated the importance of gloves or glasses during a simple electrical task? Don’t make that mistake here.

Credit: www.create-enjoy.com
Prepare The Work Area
Clear the area around the junction box to ensure easy access and safety. Turn off power at the breaker before starting any work. Gather all necessary tools and materials nearby for a smooth installation.
To successfully install decorative lighting, preparing the work area is crucial. A well-prepared space ensures safety and efficiency. Follow these steps to get your work area ready.Turn Off Power Supply
Safety is the first priority. Locate your home’s main electrical panel. Turn off the power supply to the junction box. Double-check with a voltage tester to ensure no current flows. This prevents electric shocks while working.Clear Surrounding Space
Create a clutter-free environment. Remove any furniture or items near the junction box. Provide easy access to the installation area. This keeps the work space organized and reduces the risk of accidents. Use a stable ladder if needed. Ensure proper lighting for visibility during installation.Remove Existing Fixture
Before you install a new decorative light over your existing junction box, the old fixture needs to be removed carefully. This step is crucial to ensure safety and make room for the new installation. Removing the old light might seem straightforward, but paying attention to details can save you time and prevent damage.
Unscrew Old Light
Start by turning off the power to the light at your circuit breaker. This prevents any electrical accidents while you work.
Use a screwdriver to remove the screws holding the old fixture in place. Keep these screws handy—they might come in useful for mounting the new light.
If the fixture feels stuck, gently wiggle it. Sometimes paint or grime can cause it to stick, so patience is key here.
Disconnect Wiring
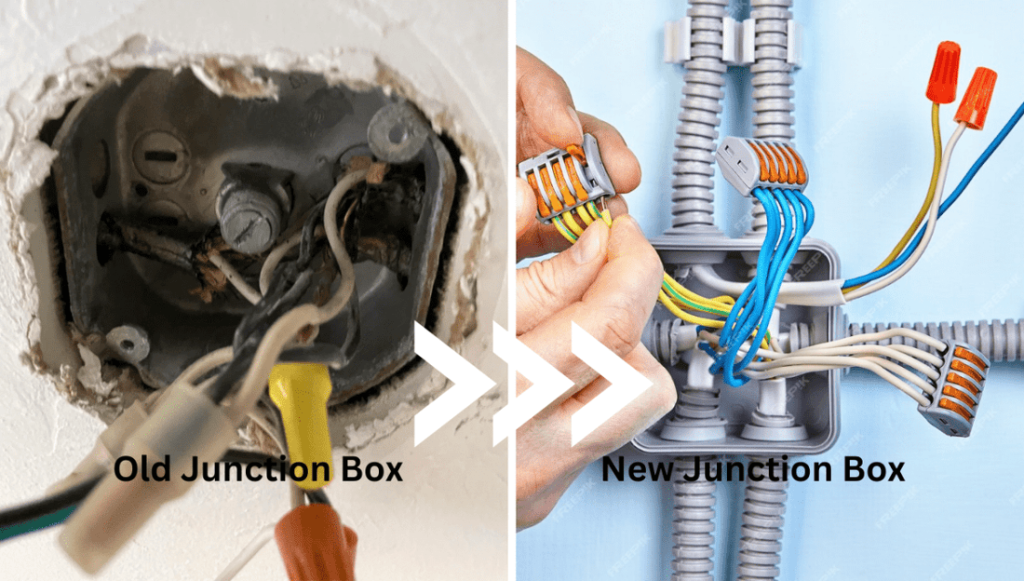
Once the fixture is loose, carefully pull it down to access the wiring inside the junction box. Take a moment to inspect how the wires are connected.
Use a voltage tester to confirm the power is off. Safety first—never assume wires are safe to touch without testing.
Next, unscrew the wire nuts or connectors and separate the wires. Remember how the wires are connected; snapping a photo can help you during reinstallation.
Credit: www.diychatroom.com
Inspect Junction Box
Before installing a decorative light over an existing junction box, taking a close look at the junction box itself is essential. This step ensures not only that your new fixture will fit properly but also that the wiring and box are safe for continued use. Skipping this inspection can lead to costly repairs or even safety hazards down the line.
Check Box Condition
Start by examining the junction box for any visible damage. Look for cracks, rust, or signs of wear that could weaken the box’s structure. A damaged box may not support the weight of your new light fixture securely.
Also, verify that the box is firmly attached to the ceiling or wall. If it moves or feels loose, tighten the screws or consider replacing the mounting hardware. A stable box is crucial for both safety and the proper function of your light.
Verify Wiring Safety
Next, assess the wiring inside the junction box. Are the wires intact and free from fraying or exposed copper? Damaged wiring can cause shorts or electrical fires.
Ensure that all wire connections are secure and properly insulated with wire nuts or electrical tape. If you notice any burnt marks or melted insulation, it’s a red flag that the wiring needs professional attention before you proceed.
Have you ever encountered unexpected wiring issues during a project? Taking the time to verify wiring safety can save you headaches and keep your home secure.
Install Mounting Bracket
Installing the mounting bracket is a key step to hang your decorative light securely. This bracket provides a solid base for the fixture and connects it firmly to the junction box. Proper installation ensures safety and stability for your new light.
Attach Bracket To Box
Start by aligning the mounting bracket with the existing junction box. Make sure the holes on the bracket match the screw holes on the box. Hold the bracket steady against the box to avoid movement.
Check that the bracket sits flush against the wall or ceiling surface. This creates a strong connection and prevents wobbling later.
Secure With Screws
Use the screws that came with the light fixture or bracket. Insert each screw into the aligned holes and tighten them with a screwdriver.
- Tighten screws evenly to avoid tilting the bracket.
- Do not overtighten screws to prevent damaging the box or bracket.
- Check that the bracket feels firmly attached and does not move.
With the bracket securely in place, your decorative light will have a strong foundation to hang safely.
Wire The Decorative Light
Wiring the decorative light is an important step to ensure safe and proper function. It involves connecting three main wires: ground, neutral, and hot. Each wire has a specific role in the electrical circuit. Follow simple steps to join these wires correctly.
Connect Ground Wire
Start by locating the ground wire. It is usually bare copper or green. Attach this wire from the light fixture to the ground wire in the junction box. Use a wire connector or wrap the wires together tightly. This connection helps prevent electrical shocks.
Join Neutral And Hot Wires
Next, identify the neutral wire, typically white. Connect the fixture’s neutral wire to it. Then find the hot wire, usually black or red. Attach the light’s hot wire to this wire. Make sure the wires do not touch each other or other surfaces.
Use Wire Connectors
Secure all wire connections using wire connectors. Twist the wires together and screw on the connector firmly. Tug each wire gently to check it is tight. Wire connectors keep the wires insulated and safe. Choose connectors that fit the wire size and quantity.
Attach Light Fixture
Attaching the light fixture to the existing junction box is a crucial step that brings your decorative lighting project to life. This part requires attention to detail and a steady hand to ensure the fixture sits securely and looks great. Let’s break down how to align and secure your new light fixture properly.
Align Fixture With Bracket
Begin by positioning the light fixture so its mounting holes line up perfectly with the bracket attached to the junction box. Take your time to check the alignment from different angles; even a slight misalignment can cause the fixture to sit unevenly.
If the fixture has a decorative plate or canopy, make sure it covers the junction box completely without gaps. Sometimes, gently twisting the fixture can help find the perfect fit. Have you ever noticed how a small misalignment can make the whole fixture look off? That’s why this step is vital.
Secure Fixture In Place
Once aligned, use the screws provided to fasten the fixture to the bracket securely. Tighten each screw gradually, alternating between them to keep the fixture balanced as you secure it.
It’s important not to overtighten, as this could damage the fixture or strip the screws. If your fixture feels loose after tightening, double-check the bracket and screw holes for any issues. What challenges have you faced in securing fixtures tightly without causing damage?
After securing, gently test the fixture by giving it a slight tug to confirm it’s stable. A firmly attached fixture not only looks better but also ensures safety and longevity for your lighting.
Test The Installation
Testing your decorative light installation is the moment where all your careful work shows its worth. It’s essential to check that everything functions properly before closing up and moving on. This step ensures safety and confirms that your new light fixture brightens the space as intended.
Restore Power
After securing the light fixture, the first thing you need to do is restore power at the circuit breaker. Don’t rush this step—take a moment to ensure the breaker is switched fully on.
Have you double-checked that no tools or wires are left exposed? Safety is key before you proceed to switch on the light.
Switch On Light
Now, flip the wall switch to test your new installation. If the light comes on immediately, that’s a clear sign your wiring and connections are correct.
What if the light flickers or stays off? Sometimes a loose wire or a bad bulb can cause this. Try replacing the bulb first to rule out simple issues.
Troubleshoot If Needed
If the light doesn’t work, start troubleshooting by turning off the power again. Carefully inspect the connections inside the junction box.
- Check that all wire nuts are tight and wires are properly matched (black to black, white to white, ground to ground).
- Look for any signs of damaged wires or loose screws.
- Consider testing the switch or breaker if everything else looks fine.
Have you ever felt stuck at this point? Sometimes, stepping back and reviewing each connection slowly helps catch mistakes you might have missed initially.
Safety Tips And Best Practices
Installing a decorative light over an existing junction box needs careful attention to safety. Following safety tips and best practices helps prevent accidents and electrical issues. It protects you and your home. Always prepare well before starting any electrical work.
Avoid Overloading Circuit
Check the circuit capacity before adding a new light. Each circuit has a limit on how much power it can handle. Overloading causes breakers to trip or wires to overheat. Use a watt meter or consult an electrician to know your circuit’s limit. Keep total wattage under the maximum allowed.
Use Proper Tools
Select tools made for electrical work. Insulated screwdrivers, wire strippers, and voltage testers keep you safe. Avoid using worn or damaged tools. Turn off power at the breaker before starting. Test wires to confirm no electricity flows. This practice reduces the risk of shocks or short circuits.
Follow Local Codes
Local electrical codes ensure installations are safe and reliable. Codes vary by location but usually cover wiring, grounding, and fixture mounting. Check your local rules or ask a professional. Use code-approved materials and follow all instructions. Proper installation meets safety standards and avoids fines.
Frequently Asked Questions
How Do I Safely Install A Decorative Light Over A Junction Box?
Turn off power at the breaker before starting. Use a voltage tester to confirm no electricity flows. Securely mount the light fixture to the junction box using screws. Follow manufacturer instructions for wiring and installation to ensure safety and compliance.
Can I Use Any Decorative Light With An Existing Junction Box?
Most standard decorative lights fit typical junction boxes. Check the fixture’s mounting bracket compatibility. Ensure the box supports the fixture’s weight. Confirm electrical ratings match to avoid overload or damage. Always follow local electrical codes for safe installation.
What Tools Are Needed For Installing Decorative Lights?
You’ll need a screwdriver, wire strippers, voltage tester, and pliers. A ladder may be required for ceiling installations. Electrical tape and wire nuts are essential for securing connections. Having these tools ready ensures a smooth and safe installation process.
How To Check If The Junction Box Is Suitable For The New Light?
Inspect the box for damage or corrosion. Confirm it is securely fastened to the ceiling or wall. Ensure it has proper wiring and enough space for the new fixture. If unsure, consult a professional electrician to avoid hazards.
Conclusion
Installing a decorative light over an existing junction box can brighten any room. Follow safety steps carefully to avoid problems. Turn off the power before starting work. Use the right tools and parts for a secure fit. Take your time and check connections twice.
A well-installed light adds style and function. Enjoy the new look you created yourself. Simple steps, great results. Ready to light up your space?