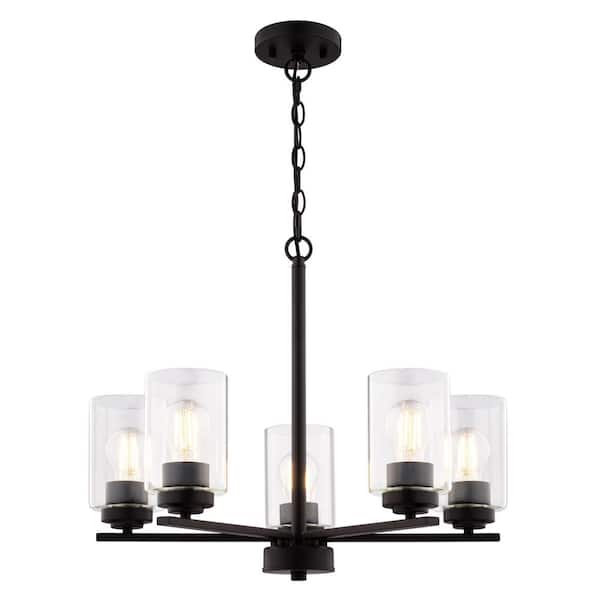
Are you ready to give your room a stunning upgrade? Installing the Home Decorators Collection 5 Light Chandelier is a simple way to add elegance and warmth to your space.
You might feel unsure about how to start, but don’t worry—this guide will walk you through every step clearly and safely. By the end, you’ll have a beautiful chandelier lighting up your home, making your space feel cozy and stylish.
Keep reading, and you’ll discover how easy it is to transform your room with this eye-catching fixture.
Gather Required Tools
Gathering the right tools before installing the Home Decorators Collection 5 Light Chandelier makes the process easier. Having everything ready saves time and avoids interruptions. It also helps keep the workspace safe and organized.
Make a checklist of tools needed for a smooth installation. Check each tool for good condition. Use tools that fit the job to prevent damage to the chandelier or ceiling.
Essential Hand Tools
- Screwdriver (flathead and Phillips)
- Pliers (needle-nose and regular)
- Wire stripper or cutter
- Voltage tester
- Adjustable wrench
Safety Equipment
- Safety glasses
- Insulated gloves
- Ladder or step stool
- Work light or flashlight
Additional Supplies
- Electrical tape
- Wire nuts
- Mounting bracket (usually included)
- Light bulbs compatible with the chandelier
Confirm the electrical box supports the chandelier weight. Use a sturdy ladder to reach the ceiling safely. Have a helper nearby for holding parts or handing tools.
Credit: www.homedepot.com
Turn Off Power Supply
Installing a new chandelier can transform your space, adding elegance and a touch of sophistication. However, before you embark on this illuminating journey, ensuring safety is paramount. The first step is turning off the power supply. This might seem straightforward, but it’s crucial to get it right to prevent accidents.
Safety should always be your top priority when dealing with electrical installations. To start, locate your home’s circuit breaker. It’s usually found in a utility area, basement, or garage. Once you find it, identify the switch that controls the room where you’ll be installing the chandelier.
Do you know how to confirm if the power is truly off? Use a voltage tester to check the wires where the chandelier will be connected. This device will alert you if electricity is still flowing. If you’re uncertain about using a voltage tester, consider asking a friend who’s handy with electrical work or consulting an electrician.
Turning off the power supply isn’t just about flipping a switch. It’s about ensuring your peace of mind as you proceed with the installation. Imagine the confidence you’ll have, knowing you’ve taken steps to safeguard your well-being. Have you ever experienced the anxiety of working near live wires? Eliminating this stress can make the installation process more enjoyable.
Once the power is off, you’re ready to dive into the installation. This simple act of precaution sets the stage for a smooth and safe setup, allowing you to focus on the exciting transformation your new chandelier will bring to your home.
Remove Old Fixture
Removing the old fixture is the crucial first step before installing your new Home Decorators Collection 5 Light Chandelier. It sets the stage for a smooth installation and ensures your safety. Taking your time here can save you from headaches later.
Turn Off The Power
Safety always comes first. Locate your circuit breaker and switch off the power to the room where you’ll be working. Double-check by flipping the light switch to confirm the power is off—no surprises when you start unscrewing the fixture.
Gather The Necessary Tools
Having the right tools at hand makes the removal process faster and less frustrating. You’ll need a screwdriver, a voltage tester, wire cutters, and possibly pliers. Preparing everything beforehand means you won’t have to pause mid-task to hunt for a tool.
Remove The Light Bulbs And Shades
Before detaching the fixture, carefully remove all bulbs and any glass shades or decorative parts. This reduces the risk of breakage and lightens the fixture for easier handling. Keep these parts in a safe place—you might want to reuse or recycle them.
Unscrew The Fixture From The Ceiling
Look for screws or nuts holding the fixture’s base to the ceiling box. Use your screwdriver or wrench to loosen them while supporting the fixture with one hand. If the fixture feels heavy, ask someone to help you hold it steady during removal.
Disconnect The Wiring
Once the fixture is free from the ceiling, you’ll see the wiring connections. Use a voltage tester again to ensure no current is present. Carefully untwist the wire connectors and separate the fixture’s wires from your home’s wiring.
Inspect The Electrical Box
After the fixture is out, take a moment to check the electrical box for damage or wear. Is it securely fastened to the ceiling? A loose or damaged box can cause problems when installing your new chandelier, so fix or replace it if needed.
Credit: www.birchlane.com
Assemble New Chandelier
Assembling your new Home Decorators Collection 5 Light Chandelier is an exciting step toward brightening your space. It’s where all the parts come together to form a beautiful fixture that suits your style. You’ll want to take your time and handle each piece carefully to ensure a secure and polished final look.
Unpack And Identify All Parts
Begin by laying out all chandelier components on a soft surface to prevent scratches. Check your instruction manual to confirm you have every piece, including the arms, light sockets, canopy, chain, and screws. Identifying parts early helps avoid surprises during assembly.
Attach The Arms To The Center Column
Start assembling by connecting each arm to the central column. Align the holes and secure them using the provided screws. If the screws feel tight, don’t force them; instead, check the alignment again to avoid damaging the threads.
Secure The Light Sockets
Next, fasten the light sockets to the ends of the arms. Make sure they’re tightly screwed in but be gentle to avoid cracking the ceramic parts. This step is crucial because loose sockets can lead to flickering lights or electrical issues.
Connect The Chain And Canopy
Attach the chain to the top of the chandelier frame. Then, connect the canopy to the other end of the chain. This setup will support the weight of the chandelier once it’s hung. Double-check the connections to ensure they’re firm and stable.
Install Decorative Elements
Add any decorative pieces like glass shades or crystals last. These elements not only enhance the chandelier’s look but also affect how the light spreads in your room. Take your time to position them evenly for a balanced appearance.
Mount The Chandelier
Mounting the Home Decorators Collection 5 Light Chandelier is a key part of the installation. It secures the fixture to the ceiling and ensures safety. Careful mounting helps the chandelier hang straight and look elegant.
Prepare the ceiling area by turning off power at the breaker. This prevents electric shock during installation. Use a sturdy ladder to reach the mounting point comfortably.
Check The Ceiling Box And Support
Make sure the ceiling box can hold the chandelier’s weight. Use a metal box rated for heavy fixtures if needed. The box must be firmly attached to a ceiling joist or support bracket.
Attach The Mounting Bracket
Secure the mounting bracket to the ceiling box using the provided screws. The bracket holds the chandelier and aligns it correctly. Tighten screws until the bracket is stable and level.
Connect The Wiring Safely
Match the chandelier wires with the house wiring colors: black to black, white to white, and green or bare copper to ground. Use wire nuts to connect and wrap with electrical tape. Push wires carefully into the ceiling box.
Hang The Chandelier
Lift the chandelier and hook it onto the mounting bracket. Support the fixture’s weight while securing it with the locking screws. Check the alignment and adjust if necessary.
Install Bulbs And Finalize
Insert the recommended bulbs into each socket. Avoid exceeding the maximum wattage listed in the instructions. Turn the power back on and test the chandelier for proper lighting.
Connect Electrical Wires
Connecting electrical wires is a key part of installing the Home Decorators Collection 5 Light Chandelier. This step powers your new light fixture and ensures it works safely. Proper wire connection prevents electrical hazards and keeps your chandelier shining bright. Follow clear instructions and use the right tools to complete this process with confidence.
Turn Off The Power Supply
Start by switching off the power at the circuit breaker. This stops electricity from flowing to the wires. Use a voltage tester to confirm no current is present. Safety first. Never skip this step.
Match Wires By Color
Identify the chandelier wires and the house wires. Usually, black or red wires are hot. White wires are neutral. Green or bare copper wires are ground. Connect wires with the same color. This ensures proper electrical flow.
Use Wire Connectors
Twist the matching wires together. Secure them tightly with wire connectors. These small caps hold wires in place and prevent sparks. Check that no bare wire shows outside the connector.
Wrap With Electrical Tape
For extra safety, wrap wire connectors with electrical tape. This adds insulation and keeps connections firm. Cover all exposed metal parts to avoid shorts.
Secure Ground Wire
Attach the ground wire to the metal mounting bracket or grounding screw. This protects against electrical shocks. Make sure the connection is tight and secure.
Secure And Adjust Fixture
Securing and adjusting your Home Decorators Collection 5 Light Chandelier ensures it hangs safely and looks perfect. This step is essential for both safety and style. Properly fixing the chandelier prevents wobbling or falling. Adjusting the fixture helps achieve the right height and balance. Follow these clear instructions to complete this process smoothly.
Attach The Mounting Bracket Securely
First, fix the mounting bracket to the electrical box. Use screws provided with the chandelier. Tighten screws firmly but do not overtighten. A secure bracket supports the chandelier’s full weight. Double-check that the bracket does not move or wiggle.
Connect The Fixture To The Bracket
Lift the chandelier carefully and align it with the mounting bracket. Insert the fixture’s screws or hooks into the bracket slots. Secure the fixture by tightening all screws evenly. Ensure the chandelier hangs straight and stable. Avoid forcing any parts to prevent damage.
Adjust The Chain Length And Fixture Height
Decide the desired hanging height for your chandelier. Shorten or lengthen the chain by opening and closing links. Use pliers for safe chain adjustments. Keep the chandelier at least 7 feet above the floor. This height offers both safety and visual appeal.
Balance The Fixture For Even Hanging
Check if the chandelier hangs level from all sides. Adjust the chain or wires if it tilts. Gently move the fixture until balanced. Use a level tool for precise adjustment. A balanced chandelier enhances room aesthetics and prevents strain on mounting parts.
Install Light Bulbs
Installing the light bulbs in your Home Decorators Collection 5 Light Chandelier is a straightforward task that sets the mood and style of your space. Choosing the right bulbs not only affects the brightness but also the ambiance you create. Let’s focus on how to add these bulbs safely and effectively.
Choosing The Right Bulbs
Check the chandelier’s specifications for bulb type and wattage limits before buying. Using bulbs that exceed the recommended wattage can cause overheating and damage. LED bulbs are a smart choice—they use less energy and last longer.
Think about the color temperature you want. Warm white bulbs create a cozy atmosphere, while cool white bulbs offer a brighter, more modern look. Your choice impacts how the room feels, so pick what suits your style and needs.
Preparing The Chandelier For Bulb Installation
Make sure the power to the chandelier is turned off to avoid any electrical hazards. Use a sturdy ladder or step stool to comfortably reach the fixture. Clear the area around the chandelier to prevent accidents or damage.
Inspect the sockets for any dust or debris. Cleaning the sockets gently with a dry cloth improves the connection and prevents flickering. This small step can save you from future frustration.
Installing The Light Bulbs Safely
Hold the bulb by its base, not the glass, to avoid fingerprints and potential breakage. Insert the bulb into the socket and turn it clockwise until it is snug, but don’t force it. Over-tightening can damage the socket or bulb.
Check each bulb after installation by turning the power back on briefly. If a bulb doesn’t light up, turn off the power and re-seat it. Sometimes a slight adjustment is all that’s needed for perfect contact.
Restore Power And Test
After completing the installation of your Home Decorators Collection 5 Light Chandelier, restoring power and testing is the final critical step. This phase ensures the fixture works safely and correctly. It confirms all connections are secure and the chandelier illuminates as expected.
Restore power carefully to avoid any electrical issues. Testing the chandelier verifies its functionality and highlights any necessary adjustments before full use.
Turn The Circuit Breaker Back On
Locate the circuit breaker that was turned off during installation. Flip it back to the “on” position. This restores electricity to the chandelier’s wiring. Wait a moment to let power flow through the system fully.
Use The Wall Switch To Power The Chandelier
Flip the wall switch connected to the chandelier. Watch the lights turn on. If the bulbs light up, the electrical connection is good. If the lights do not come on, turn off the breaker and check wiring again.
Inspect The Fixture For Proper Operation
Look at the chandelier closely while it’s lit. Check for flickering or uneven light. Make sure all bulbs are seated correctly. Adjust any loose bulbs or connections to ensure stable lighting.
Test The Dimmer Switch, If Installed
If your chandelier uses a dimmer switch, test its function. Slowly adjust the dimmer to various brightness levels. Confirm the lights respond smoothly without flickering or buzzing sounds.
Safety Tips During Testing
- Stand on a stable surface when inspecting the chandelier.
- Avoid touching exposed wiring or bulbs while powered.
- Use a flashlight if the room is dark before turning power on.
- Have a partner assist if possible for added safety.
Tips For Maintenance
Maintaining your Home Decorators Collection 5 Light Chandelier is key to keeping it bright and beautiful. Regular care prevents dust buildup and ensures every light shines clearly. Let’s dive into some simple tips that will help you keep your chandelier looking its best.
Cleaning The Chandelier Safely
Always turn off the power before cleaning to avoid any accidents. Use a soft microfiber cloth to gently wipe each arm and bulb. Avoid harsh chemicals—mild soap and water work well and protect the finish.
Try cleaning your chandelier monthly. This small effort keeps dust from dulling the shine and stops grime from building up. Have you noticed how a clean chandelier instantly lifts the room’s mood?
Checking And Replacing Bulbs
Check the bulbs regularly for flickering or dimming lights. Replace any burnt-out bulbs promptly to maintain even lighting. Use bulbs that match the recommended wattage to avoid overheating or damage.
While changing bulbs, inspect the sockets and wiring for any signs of wear. Early detection can save you from costly repairs later. Do you pay attention to small details like this during your routine home checks?
Tightening And Inspecting Fixtures
Loose parts can cause your chandelier to wobble or look uneven. Periodically tighten screws and connections using the right tools. This keeps your chandelier secure and prevents any safety hazards.
Look closely at the chains or mounting bracket for any signs of stress or damage. Addressing these issues early keeps your fixture stable. Have you ever experienced a fixture becoming loose without realizing it?
Protecting Against Environmental Damage
Keep your chandelier away from excessive moisture or direct sunlight. Humidity can tarnish metal finishes, while sunlight may fade colors. Use curtains or blinds to shield it if placed near windows.
Consider the room’s environment when choosing where to install your chandelier. This foresight helps it last longer and look fresh. How often do you think about environmental effects on your fixtures?

Credit: www.lowes.com
Frequently Asked Questions
How Do I Prepare For Installing The 5 Light Chandelier?
Start by turning off the power at the circuit breaker. Gather necessary tools like a screwdriver, wire stripper, and ladder. Read the installation manual carefully before beginning. Clear the workspace and ensure the mounting bracket is compatible with your ceiling electrical box.
What Tools Are Needed To Install This Chandelier?
You will need a screwdriver, wire stripper, pliers, ladder, voltage tester, and possibly a drill. These tools help safely mount and wire the chandelier. Having all tools ready speeds up the installation process and ensures a secure setup.
Can I Install The Chandelier Myself Safely?
Yes, if you have basic electrical knowledge and follow safety guidelines. Always turn off power before starting. Use a voltage tester to confirm wires are dead. If unsure, consult a professional electrician to avoid hazards.
How Do I Connect The Chandelier Wires Correctly?
Match the chandelier wires to your home’s wiring colors: black to black (live), white to white (neutral), and green or copper to ground. Use wire nuts to secure connections. Double-check all connections before restoring power to ensure safety.
Conclusion
Installing the Home Decorators Collection 5 Light Chandelier is simple. Follow the steps carefully for a safe setup. Take your time and check all connections. This chandelier adds style and bright light to any room. Enjoy the new look and warm glow it brings.
Now, your space feels fresh and inviting. You did a great job installing it yourself. Keep the instructions handy for future reference or maintenance. Brighten your home with confidence and ease.